Category Archives: Tips & Tricks

Lesson learned

Cooking is all about making mistakes. Sometimes you have to test recipes a few times before you get the desired result. Sometimes you just aren’t thinking straight. Over the weekend, that was me.

It has been nice and warm here in Atlanta lately — time to start firing up the grill. Eric and I were in the mood for coconut shrimp so I figured, hey, how hard could it be? I’ve made them before in the oven with great success so I just followed the same recipe.

Welp, I didn’t think about how coating shrimp in flake coconut might not be the best idea on the grill. About 30 seconds after I put the skewers on the grill, most of the coconut had fallen off the shrimp and was beginning to catch on fire. Not good. Luckily, I was able to control the flames and still salvage the shrimp. They were tasty, just not coconutty — and with a bit of a sweet char.

Next time I want to do coconut shrimp on the grill, I think I will marinade the shrimp in coconut milk for an hour or so before putting them on the grill. I think that will be met with a much higher success rate.

But not everything has been a failure! I have finally figured out the perfect way to cook quinoa — and I have The Kitchn to thank for that. I’ve used this method a few times and every time it results in the perfect, fluffy batch of quinoa. Quinoa is so much better when cooked properly, by the way.

I still owe you a recap of our eating adventures in Charleston. Spoiler alert: everything was amazing. We are heading to Las Vegas tomorrow for our anniversary trip — where we will also be eating quite a bit — so I will have a combined eating recap when we return.

Hosting an at-home wine festival

I think I’ve mentioned here before that Eric and I very much enjoy all things wine. We got engaged while on a trip to California wine country. We like trying and tasting new wines. We also love to attend an occasional wine festival every once in awhile.

After one such trip to an poorly organized wine festival last year, we thought “hey, we could put on a pretty good wine event at home.” And so we did. We’ve hosted two little at-home wine festivals so far and they’ve both been a ton of fun.

Here’s how it works. Everyone brings one bottle of wine for sharing (some people end up bringing more, which of course isn’t an issue in the slightest). Eric and I provide the venue along with some light snacks. We also usually contribute a few bottles of wine to the mix. Everyone comes over, we open the bottles, everyone samples what they want, drinks more of what they like. It’s a very fun time.

Now these at-home wine parties aren’t very structured — at least the way we do it. You could ask certain friends to bring white and others to bring red if you want. We just leave it open to what they like.

IMG_20140301_200835For snacks, I like to do a cheese plate. Cheese and wine are just the natural pairing.  I like to do a brie and some hard cheeses (above are druken goat, iberico and manchego), then I add some slices of apples and grapes, nuts and honey and boom — cheese plate done.

We also usually do some sort of small appetizer (the first time we did pigs in a blanket it. This last time we did Bagel Bites). We throw in something sweet too, like chocolate or a baked good. It isn’t a full meal or anything — just something to snack on while you are all drinking.

You don’t need to be a wine aficionado to host one of these gatherings. This is a great opportunity for people who might not know that much about wine to try a bunch of different kinds without having to take the plunge and buy a whole bottle. And it is just a good time overall. I highly recommend doing it.

The beauty of fauxmade

First of all, let me say greetings from snowy Atlanta. As some of you might have seen, we got about 2 inches of snow yesterday and it turned in to a total nightmare. Luckily, I work from home and Eric made it home before the roads got super bad, so we weren’t stranded in our cars. But I know plenty of people who were. Fingers crossed things thaw out soon.

Now on to the post. I have written before about my love of semi-homemade baked goods, and sometimes, you need to extend that practice to other aspects of cooking. I like to call this fauxmade (did I make that up? Probably not, but it sounds good). To me fauxmade is when you take some precooked ingredients or other shortcuts to make something that tastes like you slaved over a hot stove all day. Only part of the effort but still a delicious result.

soup

This was a pot of chicken and rice soup I made a few weeks ago. Instead of making my own stock with chicken and bones, I used bouillon and the juices and meat from a rotisserie chicken. That combination made for a rich, delicious soup  that both Eric and I slurped down. We preferred it to a chicken and rice soup I tried before that cooked all day in the crock pot. The above soup came together in about an hour.

Rotisserie chickens really are a fauxmade chef’s best friend. I have used them before to make soups, salads, tacos or quesadillas — even a stuffing for homemade/fauxmade ravioli. A $5 rotisserie chicken from Costco will feed Eric and I for at least two dinners, maybe even more.

I was inspired to write this post yesterday after I took a can of Manischewitz matzo ball soup and doctored it up to make it taste a bit more like the soup my mother-in-law makes.

51dAEkz9UiL._SY300_I put it in a pot with a little bouillon and water, added some carrots and parsley. It was quite tasty.

What are some of your favorite fauxmade cooking tricks?

Mahi mahi with a kale and edamame salad

One thing I pride myself on is being able to look at the ingredients I have on hand and whip something up for dinner. This delicious mahi mahi came from one of those ingenious moments.

Untitled

Eric was eating leftover Thai the other night and I had to figure out something for myself. I saw the mahi mahi. I saw the kale. I saw the edamame. Boom.

Now I have a pretty neat trick about softening kale. If you eat kale right off the stalk, it can be pretty chewy. Not that appetizing, really. Well I found a tip online that has completely changed how I eat kale. Take a big bunch of kale, put it on a bowl, sprinkle a pinch of salt on it, massage the salt in to the leave, let it sit for about 10 minutes. That is it. The salt helps break down the leaves so they have the consistency of regular lettuce. Now all I want to do is eat kale salads.

Mahi mahi with a kale and edamame salad

For the fish (This is enough for one fillet of fish. Adjust the amounts based on the servings you want).
1 piece, mahi mahi (any white, mild fish would probably work.)
1/2 clove garlic
1/4 tsp honey
1 tsp soy sauce
Shake of ginger powder (you could use fresh ginger if you have some on hand)

Mix all the ingredients together in a small bowl. Coat the fish with the marinade and let it sit for about ten minutes. Preheat the oven to 400 degrees. Place fish on a baking sheet. Bake for about 8 minutes, or until fish is cooked through.

Kale and edamame salad
1 cup softened kale
1/3 cup edamame (or however much you want), shelled, cooked and cooled
Salt and pepper to taste

Vinaigrette
2 tsp white wine vinegar
1 tsp sesame oil
1/2 tsp soy
1/2 tsp honey
Sprinkle of ginger powder (or grate of fresh ginger)

Combine the ingredients for the vinaigrette in a bowl. Whisk together and let sit for about 10 minutes for the flavors to mix together. Add in the kale and edamame and toss to coat with the vinaigrette. Season with salt and pepper. Serve alongside mahi mahi.

The pantry’s most valuable players

I try to keep our fridge and pantry as well stocked as possible. I have found over my years of cooking that there are some items that are harder to keep fresh than others and some that will just last until I need to use them.

I have found a few pantry standouts that I always have on hand that just make cooking easier for me. They are simple ways to add flavor or to cut down on prep time.
pantry items glass jars
Bouillon: I am a big fan of bouillon.  I very rarely keep chicken stock around because I don’t go through it quick enough without it going bad. Pop a bouillon cube in some boiling water — boom. Chicken stock. I find I don’t notice a difference either between bouillon and stock. I sometimes find it a tad salty, and then I’ll just dilute it with some water. But I probably reach for bouillon a few times a week.
Flavored olive oil: I love me some flavored olive oil. My friend and I bought a Living Social deal for one of those fancy olive oil shops back when I lived in DC (for those who are curious, it was Olio in Old Town Alexandria). Going around and tasting all the different varieties was so much fun for a foodie like me. I left with two in particular that have been staples of mine ever since — Sundried Tomato Parmesan Garlic Olive Oil and White Truffle Garlic Olive Oil. I use these for a simple pasta sauce or on veggies before roasting. The little bottles I got have lasted me a long time, but when they eventually run out, I think I might try to infuse some of my own.
Spices: Some herbs are just better fresh — basil, cilantro, sage. But I find that sometimes dried herbs are just as good if not better, and they are a lot easier to keep and store. One of my favorites is ground ginger. I love fresh ginger, but I have never used up a whole little root, despite how many recipes I’ve made. A little spring of ground ginger in a stir fry or some quinoa can really give a dish some zip. I’m also a big fan of high quality chili powder — it makes a huge difference when cooking tacos or chili. Another one of my favorites is vanilla bean paste. I love vanilla bean in many things. It adds depth of flavor to plain chocolate chip cookies, pound cake or even waffles. Vanilla beans themselves can be quite expensive, but vanilla bean paste is just as good, if not better. I highly recommend picking up a jar.
Pre-chopped garlic: As an Italian, I feel like it is sacrilege to say that garlic chopped and stored in oil is a pantry favorite. But I just cannot help it. It is so convenient. I use it more in everyday recipes — if I was making something for a special occasion I would bust out the fresh stuff.
Let me know in the comments what are your MVPs of the pantry. 

Home Goods and TJ Maxx haul

I am not the first person in the world to profess my love for Home Goods and TJ Maxx. But after the trip I just made, I feel as if we have a very special connection.

Home Goods and the home section of TJ Maxx are like a mecca for kitchen gadgets. From wooden cutting boards to pots and pans to utensils and serving platters, you can find just about anything you’d ever want. When there are certain kitchen items I am on the hunt for (read: a Dutch oven), I make weekly trips to see if they have what I want. The past few times I have gone I have left empty handed, but this time I hit the jackpot.

First up was Home Goods. I had picked up a few things and put them back after I thought it through. Do I really need a French press? In theory, yes. In reality, no. My Keurig works just fine.

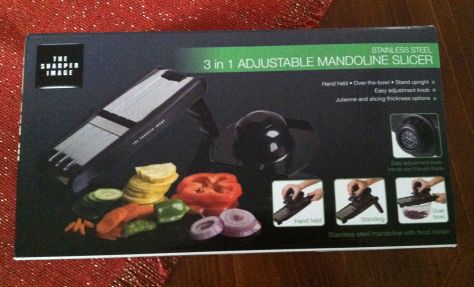
photo 4First thing I picked up was this mandolin. Awhile back I wrote that I had an unfortunate incident with my first mandolin and had been looking for a higher quality one for awhile. This Sharper Image one presented itself and the price was right so I decided to get it. The thing I like about this is that it has a stand to prop up the slicer AND the addition blades are built in via a knob you can adjust. I am quite pleased and can’t wait to use it.

photo 3These Russian doll measuring cups were too cute to resist. I always find that I wish I had multiples of certain measuring cups while I am cooking and baking and figure it can hurt to have some extras. Plus these look super cute displayed on my stove. The little skillet on the right was a check out line find. It will be great for melting butter or cooking up one egg without having to dirty up a bigger pan.

After Home Goods I moved on the TJ Maxx. While I resisted the clothing and the shoes — which is quite a feat — I did find some great items.

photo 2The bamboo serving tray was on clearance and something that is good to have for entertaining, home decor — or if Eric ever feels like bringing me breakfast in bed. The little white serving bowl I bought with the idea of using it for veggies or other side dishes. We got a lot of serving dishes for wedding gifts, but nothing this size, so for the price I figured it was a good pick up.

But ladies and gentlemen — we have come to the grand finale.

photo 1I am the proud new owner of this gorgeous cast iron Dutch oven from Cuisinart. And in my favorite color to boot. It is the perfect size and the price was ridiculous — $50! The quality is just as nice as some of the Le Cruset ones I had been eyeing so I am totally pumped about this steal. Now I’m ready to make all sorts of soups and stews this fall and winter. Hooray!

Easy Marinades

There are just some nights when you don’t feel like pulling out a recipe and going through all the steps. These are the nights where I whip up some sort of protein (chicken, fish, steak, etc) and an easy side of vegetables or quinoa or something along those lines. When I do this, I like to use one of my go-to marinades to add flavor to whatever I am cooking. These are marinades that require ingredients I usually have on hand and infuse flavor in a short time. I just used one of them last week for some salmon.

photo

For the salmon, I used a soy sauce and brown sugar marinade. I had two medium-sized pieces of salmon so I used 1/4 cup of soy, 1/4 brown sugar and about a half a teaspoon of garlic powder. You can adjust it based on how much fish you have, but a one-to-one ratio of soy to brown sugar is a good bet. I mixed it up in some tupperware (a plastic bag would work as well), put the fish in flesh side down and let it sit in the fridge for an hour. Then I popped it on the grill. Easy peasy. I love using this marinade on the grill. The brown sugar caramelizes a bit and the top of the salmon gets a tasty crust on it. The flavor of the soy and the brown sugar really penetrated in to the fish. It was quite good.

Another one of my favorites is one I learned from my mom. One of her go-to marinades is extra virgin olive oil, lemon juice and oregano. It is a great quick way to infused flavor in to chicken breasts or thighs. I will toss the chicken in a big storage bag, pour in enough olive oil to coat (1/4 to 1/2 cup usually), squeeze in half a lemon (or a couple squirts of the kind that comes prepackaged), shake in a teaspoon or so of oregano along with salt and pepper and toss it in the fridge. Let it sit for a bit (I usually like to have it in there for an hour) and then cook it however you want. This is also a great way to marinade veggies. I’ve used this with asparagus and eggplant before with good success. As I type this, I think I would like to try this out on tilapia as well.

The last marinade I’m sharing is pesto. Just straight up pesto, mixed with whatever protein you want. This summer I made both pesto shrimp and pesto chicken using this marinade. I grow my own basil , so I usually whip up homemade pesto (a handful of basil, some olive oil, Parmesan cheese, salt, pepper. No need for pine nuts or walnuts, unless you have them on hand). Mix it up until it gets the consistency you want. It shouldn’t be too liquidy, but you can add olive oil as you like), but you could just as easily use a jar of the store-bought kind. Rub the pesto on and let it sit in the fridge for a bit and then cook it up. I like pair this with pasta.

The last little bonus tip I’ll share is how to make your own spice rubs. These are especially great for steaks, but you could easily use these on chicken and pork as well. For steaks, I like to take a tablespoon of rosemary and a tablespoon of salt and grind it all together with a mortar and pestle. Using a mortar and pestle isn’t a necessity of course, but it’s a great way to break open the spices and get all the flavor. But of course you could just mix the spice and salt together without grinding and apply it to the meat. You could use this same method to make a chili-spiced rub for chicken or even a Chinese Five Spice mix on pork. No need to buy fancy spice rubs when you can easily make your own. Just experiment with what you have and with what sounds good to you.

UPDATE: Someone asked me to breakout the recipes so here you go.

Easy Marinade Recipes

Soy Sauce and Brown Sugar (Best with salmon)
1/4 cup soy sauce
1/4 brown sugar
1/2 tsp garlic powder

— Place all the ingredients above in a plastic container or bag along with the salmon (or whatever you are using). Leave in the fridge for at least 30 minutes.

Olive Oil, Lemon Juice, Oregano 

1/2 cup olive oil (doesn’t need to be extra virgin)
Juice from half a lemon (about 1-2 tablespoons)
1 tsp dried oregano
Salt and pepper

— Place all the ingredients above in a plastic container or bag along with the protein. Leave in the fridge for at least an hour, more if you have the time.

Pesto
1 cup basil leaves
1/4 cup parmesan cheese
1 glove of garlic
2 to 3 tablespoons of olive oil
Handful of walnuts or pine nuts if desired

— Blend all the ingredients in a food processor until smooth. Consistency should be somewhat of a paste, but the key is for it not to be too liquidy. Coat protein in pesto and let sit in the fridge for at least an hour.

Red Wine Braised Beef Brisket

In last week’s Friday Five, I said I would do a more in-depth post on the Red Wine Braised Beef Brisket that I made the same night as the challah.

photo
Here’s the final product. Served it up with some roasted CSA green beans.

For those of you who asked, here’s the recipe. Martha’s original recipe (linked below) called for different measurements, but I made adjustments since it was for the two of us. I also didn’t use a Dutch oven, as I’m still in the process of shopping for one. So read on for my crock pot directions.

Red Wine Braised Beef Brisket

Extra virgin olive oil (2 tablespoons for browning, 2 for later)
2 pounds beef brisket, cut into 3-inch pieces (Martha’s recipe called for 3 1/2 lbs but I made less since it was for the two of us)
Salt and pepper (for meat and to taste)
4 shallots
3 cloves of garlic
1/2 bottle of red wine (I used cab)
1 can beef stock
1 can water

1. Heat 2 tablespoons of oil over medium high heat. Season the meat on both sides with salt and pepper. Once oil is hot, place meat in the pan. Brown on all sides. This step takes a bit of time, but is worth it in the end. Once the meat is browned, places in the bottom of the crock pot.

2. Return the pan to the stove and turn the heat down to medium. Add shallots to the pan and brown and then add the garlic and saute until fragrant. Add the wine and bring to a slow simmer. Stir occasionally, making sure to scrap the bottom of the pan to get all the bits from browning the meat. Let the red wine cook down for 10 to 15 minutes. It should reduce by at least half. Once reduce, pour the entire mixture in to the crockpot. Add the can of beef stock. Fill up the can with water and dump in crockpot. Cook on low for 6 to 8 hours or high for 3 to 4. Meat should be fork tender when finished.

So this was pretty delicious. I made a different crock pot brisket back in April and this was definitely better. However, I do have some notes. The wine taste didn’t come through as much as I would have liked. I think this was because I cut it with the broth and the water. It had some wine taste, but it was very subtle. I think this could be change by adding more wine or using water instead of the beef broth. I just used a bottle that we had leftover and I didn’t want to have to open another bottle. However, I think you could make a pretty awesome sauce using the leftover cooking liquid in the crockpot. Just dump it in to a saucepan and cook it until it reduces and gets thick. If it isn’t happening quick enough, you could add some corn starch and water to speed things up. That sauce would be jam packed with delicious wine flavor. It would also be good over mashed potatoes. Noted for next time.

But still this is a solid dish. While cleaning up on Thursday, Eric proposed the idea of him assigning ratings to the things I cook — for the good of the blog of course. So I introduce the Spork System.

spork

It’s a rating scale with one spork being poor and five being amazing.  The brisket got 4 sporks and the challah got 5. So pretty solid in Eric’s mind.


The wonderful world of Pinterest

I’m sure I’m not the only person in the world who has a love affair with Pinterest.

Pinterest it great. I could spend hours going through the pages and pages of pins. Clothing. Home decor. Puppies in tea cups. I love it all. When I first got on Pinterest, I was engaged, so of course I used it for bookmarking a lot of wedding ideas. Now that we’re married and I’m “nesting” (home nesting…not like pre-baby nesting) I on a big home decor kick on Pinterest. But my hands down favorite thing about Pinterest is using it for recipe bookmarking.

I am a recipe stockpiler. I used to have folders full of tear outs from cooking magazines (more on that later). I collect cookbooks. I like to have a wide variety of potential recipes to choose from. Prior to Pinterest, I was using One Tsp to organize all my recipes from the web. It was a great site, but you had to input all your recipes individually and couldn’t upload pics easily. Pinterest makes it so much easier — and prettier.

My recipe pinboards
My recipe pinboards

Not pictured: My boards for ice cream, non-baking treats and libations. I may have a problem.

I started off with just one massive Cooking board. But it became such a hassle to scroll through it looking for a specific recipe. So one tedious day, I went through and created separate boards for separate categories. When I’m having people over and need a good appetizer, I go to that board. Going to a potluck brunch? There’s a board for that. It has made it so much easier being able to pinpoint exactly where I should be looking. I have contemplated about breaking it down even further to include boards dedicated solely to poultry, beef and seafood, but for now, I’m avoiding that bout of OCD. I have found this organizing method works wonders for me when I am menu planning for the week.

If you do some quick math, you’ll see I have more than 500 recipes bookmarked on Pinterest. And there are just the ones I haven’t tried. I have a whole board dedicated to recipes I’ve made and deemed successful enough to make again. And I have deleted recipe pins that were deemed “meh.”

When using Pinterest, find what works best for you. I just wanted to share how I do it in case anyone was looking for some organization tips.

How do you organize your Pinterest boards?

P.S. Follow me on Pinterest.

Grillin’ and chillin’

Summertime and grilling go together like peanut butter and jelly.

Despite Atlanta’s recent streak of cool and rainy weather, I’ve still been craving grilled food. Until recently this was an issue as we did not own a grill. I would have to rely on going to a friend’s house or my parent’s to enjoy grilled delicacies. But not anymore. We recently just procured our first grill.

992929_10102384209621650_1399193918_n

Ain’t it cute? When we lived in DC, we shared a small one-bedroom apartment with zero outdoor space for any type of grill. Now in Atlanta, we have a little bit of a “patio” as I call is, so we took the plunge and got this little guy at Walmart. It isn’t the biggest of grills, but the price was right and it is just the perfect size for the two of us.

This is where I talk about how I used to be scared to grill. I just never felt comfortable manning the grill. Maybe it was the propane gas or the flames, but I just never could get the hang of it. One place where I lived in DC had community grills for residents to use, and my roommate would go and grill out all the time. I would just watch her in amazement as she knew just where to put the meats and veggies to get the right cook. She never had to cut open a chicken breast to see if it was done — she just knew. She tried to teach me her ways, but nothing really stuck.

The turning point this year was Father’s Day. I was over at my mom and dad’s house making brats and I had to ask my mom a million questions about if they were done, how hot should I make the grill, etc. So when Eric saw this grill at Walmart and said we should get it, I enthusiastically said YES.  Now I am on my way to becoming a grill master. So far we’ve tried grilling steak, chicken, fish, hot dogs and sausage. Most things have been successful, others have not, but I’m sure we’ll get the hang of it eventually.

Grill master at work.

Last night my parents and brother came over for a cookout to celebrate my dad’s birthday. We made burgers, something simple enough for a newbie. My mom (who is the one taking this picture) was a great teacher. She taught me to turn the grill up high and let it flame up so the burgers char a bit on each side. She showed me how to move the burgers around to take advantage of hot spots on the grill. She also gave me a tip for cleaning the grill (Next time you turn it on, set it to high and close the lid. This way all the stuff just burns off the grate). Overall, it was a great learning experience with delicious results.

photo 3
The finished product: burgers with cheddar and pepper jack.

I’m not going to be participating in any grilling competitions anytime soon, but I am looking forward to continuing my grilling journey.

What are your favorite things to grill?